Monday, April 16, 2012

Sunday Morning Scones!!!

Good Monday Morning Friends....I know I promised some of you that I would post this recipe yesterday....but I got a little busy...Sorry!!!  :)

These scones are one of our favorite Sunday morning snacks...I added cranberries, almonds and orange zest to the recipe...but in the past I've added raspberries, blueberries, strawberries and even chocolate chips to them!!! This isn't a terribly sweet dough so you could even do a savory version...I'm thinking garlic and rosemary...Hmmmm...might have to give that one a try......anywho.....here's the recipe:


Basic Scone Recipe

4 cups all-purpose flour
1/4 cup sugar
2 Tblsp. baking powder
2 tsp. salt
3/4 lb. COLD butter, cut into pieces
4 extra large eggs, beaten slightly
1 cup heavy cream, COLD  (you could use milk, if you don't have cream if works fine)

Preheat oven to 400 degrees.

In a bowl or an electric mixer, with a paddle attachment, mix flour, baking powder and salt.

Add cold butter and mix on low speed until butter is pea sized.

In a small bowl slightly beat eggs and add the milk to the bowl, with mixer on low speed, slowly add to the flour mixture until blended together...dough will be sticky.  This is where you want to add your additional ingredients.  I added 1 pkg dried cranberries, the zest from 2 oranges and 1 1/2 cups of sliced almonds. Continue to mix until ingredients are combined.

NOTE:  if adding fresh berries, stir by hand...the mixer will crush the berries

Turn dough out onto floured surface and knead into a ball.....flour your rolling pin and roll the dough to 3/4 inch thickness. 


Make sure your surface is floured very well to avoid sticking.  Using a 3 inch round biscuit cutter (or any shape cutter you may have) cut out the scones and place on a baking pan that has been sprayed with cooking spray or covered with parchment paper.

Brush each scone with egg wash (1 egg beaten with a little milk) and sprinkle with sugar.

Bake for 20-25 minutes...until top is golden brown.

Remove to cooling rack.

For the glaze I used:

Confectioners Sugar
the juice of the 2 oranges I used for the zest

I don't measure my ingredients for the glaze...I just eyeball it!!!


I hope you'll give them a try...I'm sure your family will love them too!!!  Hope you all have a glorious day!!


'Til Next Time....


Enjoy!!!


linking to: 


Thursday, April 12, 2012

OH MY....I am SOOO Honored!!!

Hi Everybody....Just wanted to pop in and let you know that one of my projects has been featured over From My Front Porch to Yours.......Pamela featured my French Inspired Lazy Susan...


Thank You, Pamela...I am honored!!!

Please stop over and check out her site...she's got some great ideas!!!


I'm hoping to be back tomorrow to let you know what I've been working on....not one of my most fun projects...but it needed to be done!!!

'Til Next Time...


Enjoy!!!


Monday, April 9, 2012

Bringing Back an Easter Tradition

Hi Everyone.....I hope you all had a wonderful Easter weekend!!!  I know we did, even though 2 of our daughters couldn't be here with us, between being away at school or working, it's getting harder for all of us to be together, but I'm sure it's something I will eventually get used to...after all, do I have a choice?!?!.... I didn't think so!!!

Maybe it was this melancholy feeling that made me want to bring back an Easter tradition that I grew up with....when we were young my Mom always made an Italian Easter Cookie called Pupa Cu L'Ova...I'm sure some of you have heard of them or even made them yourselves, but it's something I had never attempted...until this year!!! 

My Mom always made them look so beautiful.....I'm not sure mine are as pretty, but my family & friends loved them and the memories that came flooding back as I was rolling out the dough and decorating them were so special!!!  I can only hope that some day my girls will carry on this tradition!!!  :)


BISCOTTI - PUPA CU L'OVA
4 cups flour
6 teaspoons baking powder
2 sticks (1 cup) butter, softened
1 cup sugar
2 eggs
1/3 cup of milk
1 teaspoon anise or vanilla
about 1 teaspoon anise seed (optional) if using anise seed
hard boiled eggs


Preheat oven to 350 degrees F.

Combine flour and baking powder; set aside.

Mix together softened butter and sugar; add 2 eggs. Combine flour mixture with butter-egg-sugar mixture. Add milk, anise extract, and anise seed (if using). After mixing, let rest for about 15 minutes.

Knead on lightly floured surface.

Here is where you use your imagination. It's supposed to look like a bird's nest: Make a base (about 4-5-inches in diameter each) and place a hard boiled egg in the center. I use scissors and make slits around the base. Add a small piece of cookie dough on top of the egg. Place on a lightly greased baking sheet.

Bake for 10 - 14 minutes, depending on the thickness of your cookie dough. Do not over-bake (they are not supposed to be brown). Remove from oven and cool.

Make an icing with confectioner's sugar and milk (or water). Divide and add pretty pastel food coloring. Drizzle over cookie (top of egg) and base of cookie (nest). Sometimes I sprinkle some little colored candies over icing.


ICING
Mix together:

Confectioner's sugar and milk (or water)
food coloring
little colored candies (optional)


This is what they look like before the icing:


This recipe can also be used to make the cookies shown in the lower right hand corner....which is probably what I'll be doing next!!!


Before I go, I just wanted to share the beautiful flowers that Daughter #3 gave me
when she came home from work....


My girls know what makes me happy!!!


'Til Next Time......


Enjoy!!!!


 linking to:                                     http://astrollthrulife.blogspot.com

Friday, April 6, 2012

Happy Easter Weekend!!!

Hello Friends....I wanted to take this chance to wish you the Happiest and Most Blessed Easter weekend!!  The next couple of days will be very busy for our family...tomorrow we will spend the day coloring eggs and getting everything ready for Easter dinner...and Sunday, of course, we will start the day in search of Easter baskets and attend Easter Sunday Church services....then it will be home for our traditional Easter dinner!!! 


So, I hope this Blessed day finds you happy and healthy!!!


I'll be back on Monday to share some of the yummy recipes I made...I guess I better get cooking!!!


'Til Next Time......


Enjoy!!!

linking to:  http://impartinggrace.com 

Monday, April 2, 2012

Easiest Bread Recipe....EVER!!!

Happy Monday Everybody......Hope you all had a wonderful weekend!!!  I just wanted to quickly share something I came across on Pinterest (the pin linked back to http://simplysogood.blogspot.com) !!

I'm trying to actually make some of the things I find on Pinterest so I can justify all the time I spend there!!!  LOL

For years I have shyed away from making homemade bread....you have to understand my Momma was Italian and made some of the best bread I've ever eaten!!!  We would come home from school and she would have fresh bread waiting for us....AMAZING!!!

So, when I saw the pic of this bread, I thought maybe it was time to give it a shot!!!

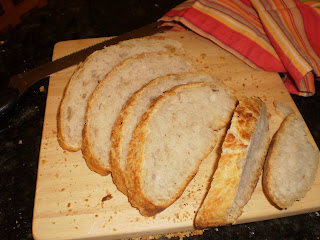
SO..GLAD..I..DID!!!.......Isn't she pretty!!!!


Click on the pictures to get a better view

Now keep in mind this bread is not baked in your standard bread pan...it's baked in a Dutch oven, so it's very rustic looking....just like the one's you see in those European style bakeries!!! YAY!!!


Crusty Rustic Bread

3 cups all-purpose flour
1 3/4 tsp. salt
1/2 tsp. yeast


Mix dry ingredients together in a large bowl


Add: 1 1/2 cups water


Stir together until combined

Cover with plastic wrap and let set for 12 to 18 hours on the countertop...DO NOT REFRIGERATE!!!
I started mine in the evening and let it set overnight...it worked out well for me!!!

After 12 hours the dough will look kind of sticky...


Preheat your oven to 450 degrees
Place your EMPTY Dutch oven with cover in preheated oven for 30 minutes.  While your pan is heating in the oven, turn the dough out onto a well floured cotton towel and cover with plastic wrap....let sit for the 30 min. that the pan is in the oven


When the pan comes out of the oven transfer the dough to the Dutch oven carefully, cover and bake for 30 minutes covered.....after 30 min. remove the cover and bake for an additional 15 minutes.

Here it is...hot out of the oven!!!
It is definitely the easiest bread recipe.....
I hope you'll give it a try!!!
'Til Next Time...
Enjoy!!!