Monday, April 16, 2012

Sunday Morning Scones!!!

Good Monday Morning Friends....I know I promised some of you that I would post this recipe yesterday....but I got a little busy...Sorry!!!  :)

These scones are one of our favorite Sunday morning snacks...I added cranberries, almonds and orange zest to the recipe...but in the past I've added raspberries, blueberries, strawberries and even chocolate chips to them!!! This isn't a terribly sweet dough so you could even do a savory version...I'm thinking garlic and rosemary...Hmmmm...might have to give that one a try......anywho.....here's the recipe:


Basic Scone Recipe

4 cups all-purpose flour
1/4 cup sugar
2 Tblsp. baking powder
2 tsp. salt
3/4 lb. COLD butter, cut into pieces
4 extra large eggs, beaten slightly
1 cup heavy cream, COLD  (you could use milk, if you don't have cream if works fine)

Preheat oven to 400 degrees.

In a bowl or an electric mixer, with a paddle attachment, mix flour, baking powder and salt.

Add cold butter and mix on low speed until butter is pea sized.

In a small bowl slightly beat eggs and add the milk to the bowl, with mixer on low speed, slowly add to the flour mixture until blended together...dough will be sticky.  This is where you want to add your additional ingredients.  I added 1 pkg dried cranberries, the zest from 2 oranges and 1 1/2 cups of sliced almonds. Continue to mix until ingredients are combined.

NOTE:  if adding fresh berries, stir by hand...the mixer will crush the berries

Turn dough out onto floured surface and knead into a ball.....flour your rolling pin and roll the dough to 3/4 inch thickness. 


Make sure your surface is floured very well to avoid sticking.  Using a 3 inch round biscuit cutter (or any shape cutter you may have) cut out the scones and place on a baking pan that has been sprayed with cooking spray or covered with parchment paper.

Brush each scone with egg wash (1 egg beaten with a little milk) and sprinkle with sugar.

Bake for 20-25 minutes...until top is golden brown.

Remove to cooling rack.

For the glaze I used:

Confectioners Sugar
the juice of the 2 oranges I used for the zest

I don't measure my ingredients for the glaze...I just eyeball it!!!


I hope you'll give them a try...I'm sure your family will love them too!!!  Hope you all have a glorious day!!


'Til Next Time....


Enjoy!!!


linking to: 


Thursday, April 12, 2012

OH MY....I am SOOO Honored!!!

Hi Everybody....Just wanted to pop in and let you know that one of my projects has been featured over From My Front Porch to Yours.......Pamela featured my French Inspired Lazy Susan...


Thank You, Pamela...I am honored!!!

Please stop over and check out her site...she's got some great ideas!!!


I'm hoping to be back tomorrow to let you know what I've been working on....not one of my most fun projects...but it needed to be done!!!

'Til Next Time...


Enjoy!!!


Monday, April 9, 2012

Bringing Back an Easter Tradition

Hi Everyone.....I hope you all had a wonderful Easter weekend!!!  I know we did, even though 2 of our daughters couldn't be here with us, between being away at school or working, it's getting harder for all of us to be together, but I'm sure it's something I will eventually get used to...after all, do I have a choice?!?!.... I didn't think so!!!

Maybe it was this melancholy feeling that made me want to bring back an Easter tradition that I grew up with....when we were young my Mom always made an Italian Easter Cookie called Pupa Cu L'Ova...I'm sure some of you have heard of them or even made them yourselves, but it's something I had never attempted...until this year!!! 

My Mom always made them look so beautiful.....I'm not sure mine are as pretty, but my family & friends loved them and the memories that came flooding back as I was rolling out the dough and decorating them were so special!!!  I can only hope that some day my girls will carry on this tradition!!!  :)


BISCOTTI - PUPA CU L'OVA
4 cups flour
6 teaspoons baking powder
2 sticks (1 cup) butter, softened
1 cup sugar
2 eggs
1/3 cup of milk
1 teaspoon anise or vanilla
about 1 teaspoon anise seed (optional) if using anise seed
hard boiled eggs


Preheat oven to 350 degrees F.

Combine flour and baking powder; set aside.

Mix together softened butter and sugar; add 2 eggs. Combine flour mixture with butter-egg-sugar mixture. Add milk, anise extract, and anise seed (if using). After mixing, let rest for about 15 minutes.

Knead on lightly floured surface.

Here is where you use your imagination. It's supposed to look like a bird's nest: Make a base (about 4-5-inches in diameter each) and place a hard boiled egg in the center. I use scissors and make slits around the base. Add a small piece of cookie dough on top of the egg. Place on a lightly greased baking sheet.

Bake for 10 - 14 minutes, depending on the thickness of your cookie dough. Do not over-bake (they are not supposed to be brown). Remove from oven and cool.

Make an icing with confectioner's sugar and milk (or water). Divide and add pretty pastel food coloring. Drizzle over cookie (top of egg) and base of cookie (nest). Sometimes I sprinkle some little colored candies over icing.


ICING
Mix together:

Confectioner's sugar and milk (or water)
food coloring
little colored candies (optional)


This is what they look like before the icing:


This recipe can also be used to make the cookies shown in the lower right hand corner....which is probably what I'll be doing next!!!


Before I go, I just wanted to share the beautiful flowers that Daughter #3 gave me
when she came home from work....


My girls know what makes me happy!!!


'Til Next Time......


Enjoy!!!!


 linking to:                                     http://astrollthrulife.blogspot.com

Friday, April 6, 2012

Happy Easter Weekend!!!

Hello Friends....I wanted to take this chance to wish you the Happiest and Most Blessed Easter weekend!!  The next couple of days will be very busy for our family...tomorrow we will spend the day coloring eggs and getting everything ready for Easter dinner...and Sunday, of course, we will start the day in search of Easter baskets and attend Easter Sunday Church services....then it will be home for our traditional Easter dinner!!! 


So, I hope this Blessed day finds you happy and healthy!!!


I'll be back on Monday to share some of the yummy recipes I made...I guess I better get cooking!!!


'Til Next Time......


Enjoy!!!

linking to:  http://impartinggrace.com 

Monday, April 2, 2012

Easiest Bread Recipe....EVER!!!

Happy Monday Everybody......Hope you all had a wonderful weekend!!!  I just wanted to quickly share something I came across on Pinterest (the pin linked back to http://simplysogood.blogspot.com) !!

I'm trying to actually make some of the things I find on Pinterest so I can justify all the time I spend there!!!  LOL

For years I have shyed away from making homemade bread....you have to understand my Momma was Italian and made some of the best bread I've ever eaten!!!  We would come home from school and she would have fresh bread waiting for us....AMAZING!!!

So, when I saw the pic of this bread, I thought maybe it was time to give it a shot!!!

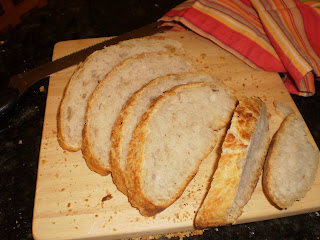
SO..GLAD..I..DID!!!.......Isn't she pretty!!!!


Click on the pictures to get a better view

Now keep in mind this bread is not baked in your standard bread pan...it's baked in a Dutch oven, so it's very rustic looking....just like the one's you see in those European style bakeries!!! YAY!!!


Crusty Rustic Bread

3 cups all-purpose flour
1 3/4 tsp. salt
1/2 tsp. yeast


Mix dry ingredients together in a large bowl


Add: 1 1/2 cups water


Stir together until combined

Cover with plastic wrap and let set for 12 to 18 hours on the countertop...DO NOT REFRIGERATE!!!
I started mine in the evening and let it set overnight...it worked out well for me!!!

After 12 hours the dough will look kind of sticky...


Preheat your oven to 450 degrees
Place your EMPTY Dutch oven with cover in preheated oven for 30 minutes.  While your pan is heating in the oven, turn the dough out onto a well floured cotton towel and cover with plastic wrap....let sit for the 30 min. that the pan is in the oven


When the pan comes out of the oven transfer the dough to the Dutch oven carefully, cover and bake for 30 minutes covered.....after 30 min. remove the cover and bake for an additional 15 minutes.

Here it is...hot out of the oven!!!
It is definitely the easiest bread recipe.....
I hope you'll give it a try!!!
'Til Next Time...
Enjoy!!!

Friday, March 30, 2012

Problem Solved...I hope!!!

The last couple of days we've been experiencing some "technical difficulties" with our internet....well, after several phone calls to our ISP and many hours of aggravation and frustration, I'm hoping that the problem has been solved.  It seems there was a problem with our modem, so my wonderful husband made the trip to our ISP office and picked up a new one and came home and installed it...so far, so good!!!!  YAY!!!

I took advantage of my time "off-line" to cook and bake up some yummy recipes....hope you like them as much as we did!!!

First up is Pulled BBQ Chicken sandwiches.....SUPER easy and  VERY yummy!!!  I served it on toasted kaiser rolls with french fries and homemade cole slaw!!!


Pulled BBQ Chicken

1 2 lb. rotisserie chicken
 (you could roast your own, but why bother when so many grocery stores offer them already roasted)

1 Bottle BBQ Sauce
(your favorite homemade or bottled...I used our favorite bottled)

Preheat a skillet and add enough olive oil to thinly cover the bottom of the pan.  Take the chicken off the bone and shred.  Place in the heated skillet and saute just until warmed through.

Using your favorite recipe for BBQ sauce or your favorite bottled sauce, add enough to the skillet to completely cover the chicken and cook until heated through.  Serve on kaiser rolls or hambuger rolls.

See I told you it was EASY!!!


Cole Slaw

4 cups shredded green or red cabbage
1 cup shredded carrot
1/4 cup thinly sliced green onion

Shred cabbage, carrot and onion into large bowl...set aside

Dressing

1 cup mayonnaise or salady dressing
1 Tblsp. vinegar
1 tsp. sugar
1 tsp. celery seed
1/2 tsp. salt

Add all ingredients to meduim bowl and mix together well.  Add to the cabbage mixture and stir thoroughly.

Regrigerate until chilled through....usually at least 1 hour!!!

and for dessert....Skillet Chocolate Chip Cookie.....another SUPER easy recipe (do you see a pattern here???).....served with vanilla ice cream and drizzled with chocolate syrup....does it get any better than that?!?!?!


Skillet Baked Chocolate Chip Cookie


2 cups all-purpose flour
1 teaspoon baking soda
1/2 teaspoon salt
3/4 cup unsalted butter, softened
1/2 cup sugar
3/4 cup packed light-brown sugar
1 large egg
2 teaspoons pure vanilla extract
1 1/2 cups (about 9 ounces) semisweet-chocolate chips
                                     
Preheat oven to 350 degrees. In a medium bowl, whisk together flour, baking soda, and salt; set aside.

 In the bowl of an electric mixer fitted with the paddle attachment, cream butter and sugars until mixture is light and fluffy, about 2 minutes. Add egg and vanilla; mix until they are fully incorporated. Add flour mixture, and beat until just combined. Stir in chocolate chips.

Transfer dough to a 10-inch ovenproof skillet, and press to flatten, covering bottom of pan. Bake until edges are brown and top is golden, 40 to 45 minutes. Don't overbake; it will continue to cook a few minutes out of the oven. Transfer to a wire rack to cool, 15 to 20 minutes. Cut into 8 wedges. Serve warm; top each wedge with a scoop of ice cream and drizzle with chocolate syrup. 


We've got another BUSY weekend ahead of us!!!!!  Any big plans for you???  Whatever you have planned....Have Fun!!!


'Til Next Time...

Enjoy!!!

linking to: http://stonegable.blogspot.com

linking to:  http://atthepicketfence.com 

Tuesday, March 27, 2012

Projects: Past, Present & Future

Hi Everybody....I spent some time the other day going through some older photos on my Kodak easy share and came across some of the projects that  I've gotten done.  Some of them are from a couple of years ago, but I thought I'd share them with you anyway....

This is my pot rack...I had wanted one for a very long time but couldn't find one I really liked, or could afford, so I decided to make one myself...it's just a very simple rack and one of these days I'll get around to spray painting the chains black...

...the bar stools I painted...

I made this pillow out of painters dropcloth fabric and stenciled on the pattern...
and more recently
 I had some pretty orange fabric that I planned on using to make a valance for my kitchen window.....
   nothing special, a couple of hems and seams, but it certainly did add a punch of color where it  was    needed!!!


and remember the cute little vanity chair that was begging for some new fabric on it seat....
...here she is right where she belongs...


Well...there's a few things done...now on to making the list of upcoming projects....flower beds, painting the porch swing, expanding the patio, etc., etc....oh yeah, I still have the hall cupboard to finish...but more on that later!!!


'Til Next Time...

Enjoy!!!

Tuesday, March 20, 2012

HAPPY SPRING!!!

It's official....Spring is here!!!  According to the calendar, at least!!!  Now, I've lived here long enough to know that anything can happen weather wise in March.....even though it was 74 degrees today that doesn't necessarily mean it's here to stay...but as long as it is, I'm going to take advantage of it!!!


There's nothing like a burger on the grill when the sun is shining and the birds are singing.....

So YUMMY!!!

served with Canellini Bean salad and potato salad!!!
The canellini bean salad is really good and pretty healthy, too...give it a try!!!

Canellini Bean Salad

2 cans Canellini Beans, drained and rinsed
Half of a seedless cucumber
1 pint grape tomatoes, halved or quartered
1/2 medium onion, chopped finely
1 clove garlic, finely chopped
Olive Oil
Salt & Pepper to taste

Toss beans, cucumber, tomatoes, onion and garlic together.  Drizzle with Olive Oil; add salt & pepper to taste.  Refrigerate until chilled.


...and it's hard to believe that it's March 20 and I can walk through my yard and see new growth....I love the color GREEN....


...beautiful new growth on my day lillies...I can't wait to see these orange flowers...

...buds on my dwarf rhododendron.....these will be bright pink when it blooms...


....and buds on my weeping cherry tree (not to mention the GREEN grass)...

I don't have anything in bloom in my gardens right now, but if these temps stick around, I can't imagine it will be too much longer....can't wait to post pics when everything is in bloom!!!

Hope everyone has a chance to get out and enjoy the sunshine!!!

'Til Next Time...

Enjoy!!!

Friday, March 16, 2012

Curtains, Coasters, A Cushion, A Cupboard & Cooking...

....just a few of the projects I have lined up for this coming weekend!!! It's going to be a busy couple of days!!!

But first, here are some pretty Orange Tulips to brighten your day!!!


Curtains...I fell in love with this orange fabric....I'm hoping to make a curtain valance for the kitchen!!!


Coasters...The coasters I made out of ceramic tiles and cocktail napkins were such a hit, my daughters have now requested them for their apartments...one set down one more to be made...

linking my coaster to:  http://funkyjunkinteriors.blogspot.com ,  http://theivycottageblog.blogspot.com and http://www.asimplyklassichome.blogspot.com
http://www.atthepicketfence.com http://www.theroosterandthehen.com

A Cushion.....I've had this sweet little vanity chair forever (see her pretty legs on the right)....it's seen many fabric changes over the years and will probably see many more...


 A Cupboard (table)....this is the little cupboard (table) that lives in the upstairs hallway...not really loving the palm trees!!!  The wood will stay as it is, but the palm trees on the door have got to go...they're not really my style!!!


Also on the agenda for this weekend is a little road trip on Sunday to see Daughter #2....that's where the cooking comes in....seems she's hungry for Lemon Bars....so I'm heading to the kitchen!!!


Hope everyone has an amazing weekend...get out there and enjoy the beautiful weather!!

'Till Next Time...

Enjoy!!!

Wednesday, March 14, 2012

WOW Us Wednesday @ Savvy Southern Style!!!

Hello Friends,

I'm linking this wonderful chicken recipe to the WOW Us Wednesday party over at http://savvysouthernstyle.blogspot.com !!

Not only is it delicious, but it's very photogenic!!!  LOL

Stop by and visit Kim's blog....she's got a beautiful home and great design style!!!


Skillet Lemon Rosemary Chicken

3/4 to 1 lb. baby red potatoes, halved or quartered, depending on the size
Kosher Salt
2 large springs of Rosemary, plus 2 Tblsp of the leaves
2 cloves of garlic, chopped
Pinch of red pepper flakes
Juice of 2 lemons (squeezed and halves reserved)
2 Tblsp. olive oil, plus some to drizzle in the pan
4 Chicken breasts (bone-in, skin-on)
          10 oz. baby bella or crimini mushrooms, cut in half

Preheat oven to 450 degrees. Clean and cut potatoes, put in sauce pan, cover with water and bring to a boil over med-high heat and cook until tender, about 8 minutes. Drain and set aside.

Season both sides of the chicken and
in a large cast iron skillet, or other large skillet, drizzled with olive oil, brown both sides of the chicken until the skin is very crispy. Remove from skillet to a plate and set aside.

Pile rosemary leaves, garlic, crushed red pepper flakes on a cutting board and mince together until very fine. Transfer this mixture to a bowl and stir in the juice of 1 lemon and the olive oil.

Add potatoes and mushrooms to the skillet and place the chicken on top of the potatoes and mushrooms and drizzle with the rosemary, garlic and crushed red pepper mixture, making sure to evenly coat each piece of chicken and squeeze the remaining half of the lemon over the chicken.

Add the 2 large rosemary sprigs and squeezed lemon halves to the skillet and place the skillet in the oven and roast, uncovered, until the chicken is cooked through. About 20-30 minutes.

Serve right from the skillet and don't forget to get some of the pan juices when serving the potatoes and mushrooms!!!

'Til Next Time...

Enjoy!!!

Tuesday, March 13, 2012

Another Party...Oh my!!!

Yep, I'm linking up to another party today hosted by Marty a http://astrollthrulife.blogspot.com  ....she's got a great blog and is very talented!!!


Today she is hosting an Egg-cellent Spring Cloche Party so I thought I send my Easter Egg Cloche on over...

Stop over and check it out!!!

'Til Next Time...

Enjoy!!!

Monday, March 12, 2012

It's a Copy Cat Challenge!!!

Well, I did it...I joined my first link up party at Debbiedoo's (http://debbie-debbiedoos)  !!!  I decided to enter my Lazy Susan that I painted with a French motif that I showed you in my post on March 10...I've seen alot of these around the internet on various sites including Pinterest....it's a super easy project!!!  I used a $7.95 lazy susan from IKEA, stencils that I already had and black acrylic craft paint...this started as a plain, pine lazy susan...amazing what a little paint can do (wish I had a before pic)!!!


'Til Next Time...

Enjoy!!

Saturday, March 10, 2012

Sometimes life gets a little crazy....

....and that's exactly what's been going on here lately!!! Some days there's just not enough time to get everything done....and on top of that I've got a major case of cabin fever!!! 
We've been taking the simple approach in the kitchen...just kind of going with easier, less time consuming meals...it's been kind of nice and it's given us some time to think about some other projects that we've got coming up!!!


So, even though I haven't done alot of cooking I've still got a couple of sweet recipes for you today....the apple tart was soooo good and the crust is super simple to make (thanks to Pioneer Woman) and the orange olive oil cake, may sound kind of strange but it is really yummy!!!


Apple Tart

For the crust:

3 cups all-purpose flour
1 tsp. salt
1 1/2 sticks butter, cold
3/4 cup vegetable shortening
1 egg
5 Tblsp. cold water
1 Tblsp. distilled white vinegar

Combine the flour and salt in a large bowl.  Add the butter, shortening.  Using a pastry cutter, gradually work the butter and shortening into the flour until the mixture resembles tiny pebbles.  This step should take 3 or 4 minutes.

Lightly beat the egg with a fork and add it to the flour mixture.  Next, add in the cold water and vinegar.  Stir the mixture together until it's just combined (I prefer to use my hands), be sure not to over mix.  Remove the dough from the bowl and wrap in plastic wrap and refrigerate for at least 30 minutes.

For the filling:

4 cups apples, peeled,cored and sliced (I used Empire), but use what you prefer
Sugar, to your taste
Cinnamon, to taste
2 Tblsp. flour, enough to thicken the apples

Mix all ingredients together.

Roll out pie crust to approx. 9 or 10 inch round and put on baking sheet.  Pile apples in center of crust leaving enough crust to fold over the edges of the apples about 3 or 4 inches.
Bake at 350 degrees for about 45 minutes, until crust is nicely browned and apples are tender.

Glaze:

2 cups confectioners sugar
Milk, enough to make a drizzle consistency
1 tsp. vanilla

Whisk all ingredients together and drizzle over cooled tart.


Orange Olive Oil Cake

3 cups all-purpose flour
1 Tblsp. baking powder
1 tsp. kosher salt
4 large eggs, separated
2 cups granulated sugar
1 cup plain yogurt
3/4 cup extra-virgin olive oil
Zest from 3 oranges
1 1/2 tsp. vanilla

Preheat oven to 350 degrees.  Generously spray a 10 inch bundt pan with cooking spray.

In a large bowl, whish together flour, baking powder and salt.  Set aside.

In another large bowl, beat egg yolks until they are pale and light; slowly pour in 2 cups sugar until it's completely incorporated.  Add the yogurt and olive oil and mix thoroughly combined.  Add the orange zest and vanilla, mix thoroughly.

Add the flour to the wet mixture in 2 parts, beating well after each addition, until just combined, scrape the sides of the bowl and beat an additional 5 seconds.

In a seperate bowl, beat the egg whites until stiff peaks form, Scoop 1 cup of the egg whites into the batter and using a rubber spatula fold into the cake batter, until combined.  Add remaining egg whites and continue to fold into the batter.

Pour the batter into the bundt pan and bake for 40-50 minutes, until a toothpick inserted comes out clean.  Transfer pan to cooling rack and cool for 10-15 minutes.  Gently loosen the sides of the cake from the pan and turn onto the cooling rack. Cool completely.

Dust with powdered sugar or using the glaze recipe above, drizzle over the cake.
I wish I'd taken a before pic of this...
it started life as a very plain pine lazy susan that cost $7.95 from IKEA....it's amazing what a little paint can do!!!  :)

Next thing on my "To Do" list is my Spring/Easter Decorating....I'll let you know what I come up with!!
'Til Next Time....

Friday, March 2, 2012

Spring Cleaning...Is it too early???

Good Friday Afternoon Friends....I don't know about you, but I'm in the mood for some Spring!!!  We've been very fortunate here with the winter weather this year...it's been VERY mild for this part of the country....but I'm ready to get outside and play in the dirt (not mud or snow)!!!  I'm so looking forward to planting and weeding and just BEING outside and going to the farmer's market for real fresh produce!!!

Until I can get outside, I guess I'll pass the time doing some Spring cleaning inside....it amazes me how much clutter accumulates over the winter months!!!  To keep my energy up while I'm working so hard, I think I'll make batch of homemade granola...it's wonderful by itself, as a cereal with some skim milk or mix it into Greek vanilla yogurt and you've got a great breakfast or snack!!!  Hope you'll give it a try!!!

Homemade Granola

4 cups rolled oats
2 cups coconut
2 cups slivered
1cup cashews
3/4 cup olive oil
1/2 cup honey
2 tsp. ground cinnamon
1 tsp. kosher salt

Preheat oven to 325 degrees.

Combine all ingredients in a large bowl and mix together until oil and honey are well distributed.

Spread on to 2 baking sheets and bake for 20-30 minutes, stirring half way through.
Remove from oven and let cool on baking sheets.

Additional Ingredients (add after baking):

Craisins
Raisins
Dates
Dried Apricots
Dried Cherries
Chocolate chips


Have a GREAT weekend!!!

'Til Next Time...

Enjoy!!!

Thursday, March 1, 2012

You Asked For It...

Hi Everybody...Today's post is for a couple of my friends that have requested one of my soup recipes...this soup is so yummy and my whole family loves it, especially Daughter #4....she likes it so much she asked for it for her birthday dinner!!!  :)

Chicken Meatball soup is one of those dishes that is hearty and warm but still on the light side.  Served with warm Italian bread...it's the perfect cozy evening meal!!!


Chicken Meatball Soup
For the meatballs:
1/4 cup bread crumbs
1/4 cup chopped parsley
2 large eggs, lightly beaten
1 Tblsp. milk
1 Tblsp. ketchup
3/4 cup grated romano cheese
1 large clove of garlic
1 tsp. salt
1 tsp. black pepper
1 lb. ground chicken
  
In a meduim bowl stir together the bread crumbs, parsely, eggs, milk, ketchup, romano cheese, salt and pepper. Add the chicken and gently combine all ingredients together.
Using a teaspoon for measurement, roll meat mixture into approx. 1 inch meatballs.
In a large skillet or pot, heat  1/4 olive oil over medium heat.  Working in batches, brown the meatballs in the hot oil, be sure not to overcrowd the pan. 
When all the meatballs have been browned, remove from pan and set aside. 
For the Soup:
4 cups chicken broth or stock
3 cups grape tomatoes. cut in half
1/2 cup parmesian cheese, grated
2 cups Baby spinach
In the same pan that the meatballs were cooked in add the grape tomatoes and saute just until tender.  Add the chicken stock to the tomatoes and bring to a boil.  Add meatballs to broth and tomatoes and simmer until the meatballs are cooked through and add baby spinach.
While soup continues to cook, bring a pot of salted water to a boil and cook the orrichiette pasta until tender.  Drain and add to soup.   Top with grated parmesian.


"Til Next Time...

Enjoy!!!  :)


Tuesday, February 28, 2012

Do More of What Makes You Happy!!! :)

I'M BACK!!!  After alot of soul searching and working through some things....it feels good to be back on track!!!  I need to concentrate on what's REALLY important and put all the other "stuff" in the trash!!!

As soon as I saw this quote today, I knew it was something I needed to remember so I wrote on the blackboard in the kitchen:


I'm looking forward to alot of great things coming up in the next few months.....spelling bees, concerts, 2 graduations, the list goes on and on....and these are the things that make me HAPPY...so from here on out that's what I'm focusing on....well, that and FOOD.....after all we all need to eat!!!  :)

And speaking of food...I wasn't quite sure what I wanted to do for dinner tonight (I HATE when that happens) until I was walking through the grocery store after work and finally came up with a plan (nothing like waiting til the last minute)... and in the end the plan came together (I LOVE when that happens)!!!  The decision was made:  Top round roast braised in red wine, creamy polenta with red wine mushroom gravy and roasted brussel sprouts, carrots and asparagus!!!  So yummy and so easy!!!

I started by searing a 4 lb. top round roast in a skillet.  When seared on all sides I transferred it to a deeper oven-safe pan and added about 1/2 a bottle of red wine. The roast should be submerged about half way in the wine. Cover and put in the oven at 350 degrees and cook for 1 1/2 to 2 hours depending on the size of the roast and the doneness you're looking for.  Let the roast rest for about 20 minutes after you take it out of the oven.

While the roast is cooking, you can get your veggies prepped and ready to go in the oven:
I toss my veggies in olive oil, garlic, salt and pepper and roast in the oven at 425 degrees for about 20 minutes or until tender.  

While my veggies are cooking I made my red wine mushroom gravy (I added some beef stock & sliced mushrooms to the wine)
I brought the liquid to a boil and thickened it with a slurry of cornstarch and water

...And the final result.....I served ours with polenta, but mashed potatoes would be delicious too!!!
So Yummy!!!


'Til Next Time...

Enjoy!!!


linking to: